Table of Contents
ToggleGetting Started with Your Crochet Beanie
Understanding the Basics
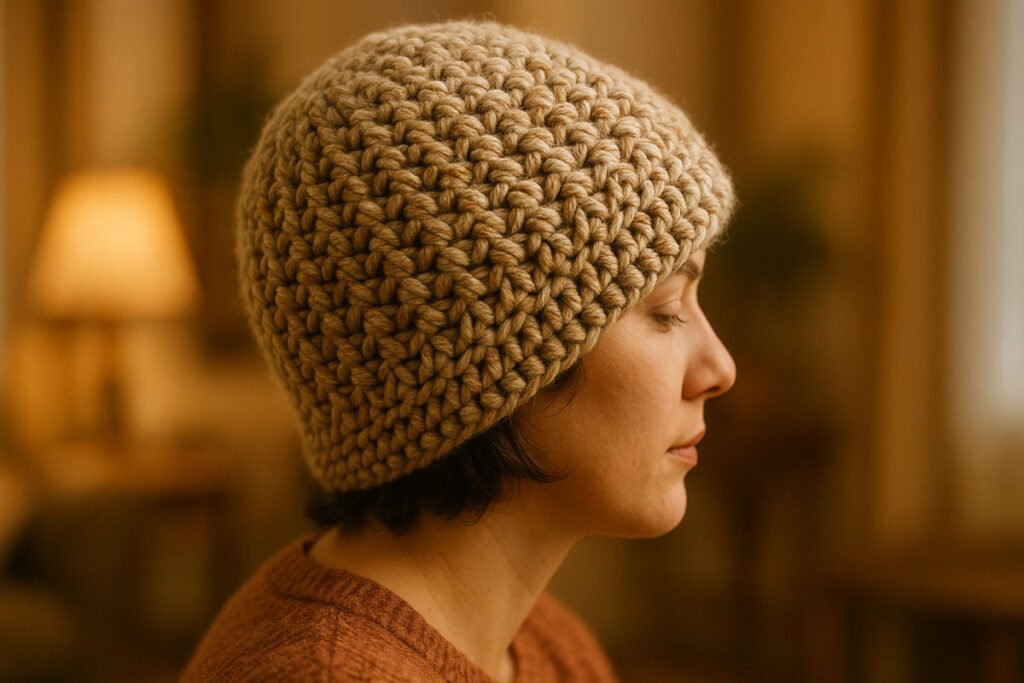
A crochet beanie is so much more than just a way to keep your head warm in the winter. It’s a handmade piece of art that shows off your personal style. These versatile hats have become incredibly popular because they’re not only cozy but also offer endless ways to customize them. Whether you’re whipping one up for yourself or as a special gift, making a crochet beanie is a fun and rewarding project for any crafter.
From chunky, textured designs that make a bold statement to sleek, modern styles that are effortlessly cool, there’s a crochet beanie pattern out there for everyone. The real magic of this craft is in its simplicity. With just a hook and some yarn, you can create something that’s totally unique and practical. It’s a project that lets your creativity run wild while making something you’ll love to wear.
Choosing the Right Yarn
The yarn you pick will really set the tone for your beanie. If you’re going for a classic, warm-and-cozy vibe, wool is a fantastic choice. It’s a natural fiber that’s amazing at keeping you warm, even if it gets a little wet from snow. Plus, it has a natural stretch that helps the beanie fit snugly and hold its shape.
If you’re looking for something that’s easy on the wallet and simple to care for, acrylic yarn is a great way to go. Today’s acrylics are super soft, come in every color you can imagine, and are usually machine washable. This makes them perfect for a beanie you’ll wear all the time or for giving as a gift. For a little bit of luxury and some serious warmth, you might want to try alpaca yarn. It’s known for being incredibly soft and a great insulator.
Selecting the Perfect Hook
Think of your crochet hook as the magic wand that turns a ball of yarn into a stylish beanie. The size of the hook you’ll need is determined by the weight of your yarn. Most yarn labels will suggest a hook size, and that’s a great place to start. Using the right hook size will help you make even stitches and create a fabric with the perfect density.
A bigger hook will give you a looser, more open fabric, while a smaller one will make a tighter, denser fabric. For a good beanie, you want a fabric that’s solid enough to be warm but still has some flexibility. Don’t be afraid to play around with different hook sizes to see how it changes the look and feel of your beanie.
The Crocheting Process: From Start to Finish
Mastering the Fundamental Stitches
You’d be surprised how many amazing beanies are made with just a couple of basic stitches. The single crochet and half double crochet are two of the most common stitches you’ll see in beanie patterns. Once you get these down, you’ll be ready to tackle almost any project. The secret to a beanie that looks like it was bought in a boutique is keeping your tension consistent, which just means making sure all your stitches are the same size.
It’s a good idea to practice your stitches on a little test swatch before you dive into your beanie. This helps you find a comfortable rhythm and get your tension just right. It might take a little practice to get the hang of it, but every crafter develops their own unique tension over time, so don’t sweat it.
Following a Simple Pattern
If this is your first crochet beanie, it’s a good idea to start with a simple, beginner-friendly pattern. A lot of patterns have you crochet a flat rectangle first, which you then sew together to make the hat. This is a really straightforward method that lets you focus on getting your stitches right without having to worry about any tricky shaping.
A good pattern will walk you through making the brim, the body of the hat, and then finishing off the crown. By breaking it down into these easy steps, you can build your confidence as you go. Think of a well-written pattern as a friendly guide, leading you to a finished beanie you can be proud of.
Sizing Your Beanie for a Perfect Fit
One of the best things about making your own crochet beanie is that you can make it fit perfectly. To get the size right, you’ll need to measure the circumference of the head at its widest part, which is usually just above the eyebrows. This measurement will be your guide for how wide to make your beanie.
Most patterns will tell you how to adjust the size, but a good rule of thumb is to make the beanie’s circumference a little smaller than the head measurement, since the crochet fabric will stretch. For the height, measure from the crown of the head down to the bottom of the earlobe. This will give you a beanie that’s comfortable and looks great.
Finishing Touches and Customization
Assembling Your Beanie
Once you’ve finished crocheting the main part of your beanie, it’s time to put it all together. If you used the rectangle method, you’ll sew the two shorter ends together to make a tube. Then, you’ll gather the top of the tube to close up the crown. A simple running stitch along the top edge, pulled tight, will do the trick and give you a neat finish.
Taking a little extra time to finish your beanie carefully really makes a difference. Weaving in your yarn ends securely will make sure your hard work lasts. A clean, professional finish is what makes a handmade item truly special.
Adding Personal Flair
Now for the fun part – making your beanie your own! A fluffy pom-pom on top is a classic and playful touch. You can make one yourself with a pom-pom maker or buy a faux fur one for a more chic look. A custom leather or fabric tag sewn onto the brim can also give your beanie a cool, personalized vibe.
Don’t be shy about playing with color. You can create stripes, color blocks, or use a variegated yarn for a cool, one-of-a-kind effect. The possibilities are endless, so let your creativity flow and design a crochet beanie that’s all you.
Caring for Your Creation
To keep your crochet beanie looking great, you’ll want to take good care of it. How you wash it will depend on the yarn you used. Wool and other animal fibers usually need to be hand-washed in cool water and laid flat to dry. This will keep the fibers from felting and help the beanie hold its shape.
Acrylic and other synthetic yarns are usually more durable and can often be tossed in the washing machine and dryer. Always check the yarn label for the best way to care for it. With a little love, your handmade beanie will be your go-to accessory for many seasons to come.